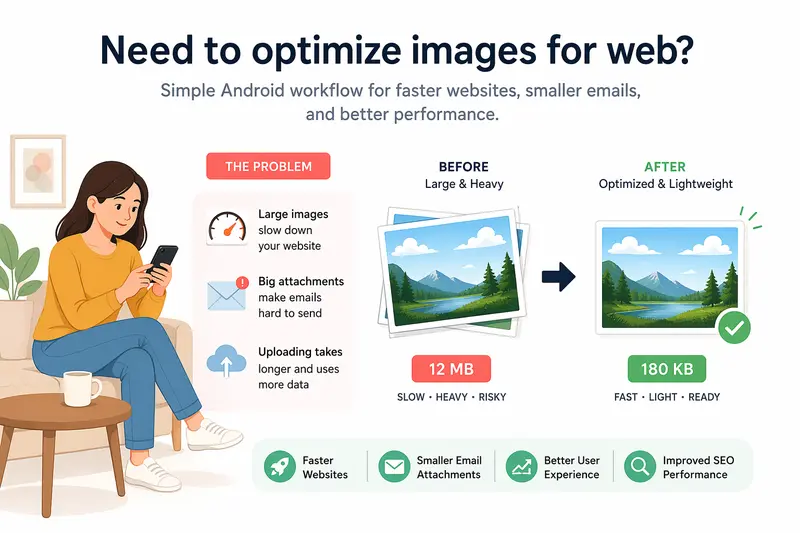
You’re preparing a campaign on your phone—product shots, social visuals, maybe a few banners—and suddenly page load speed becomes a problem. Large images slow everything down, and sending files over email turns into a headache. If you need to optimize images for web, doing it directly from Android isn’t just possible—it can be surprisingly efficient.
What you should know upfront
Optimizing images on mobile doesn’t mean sacrificing quality. With the right workflow, you can achieve high quality image compression, reduce file sizes for email, and improve website performance—without jumping between multiple apps.
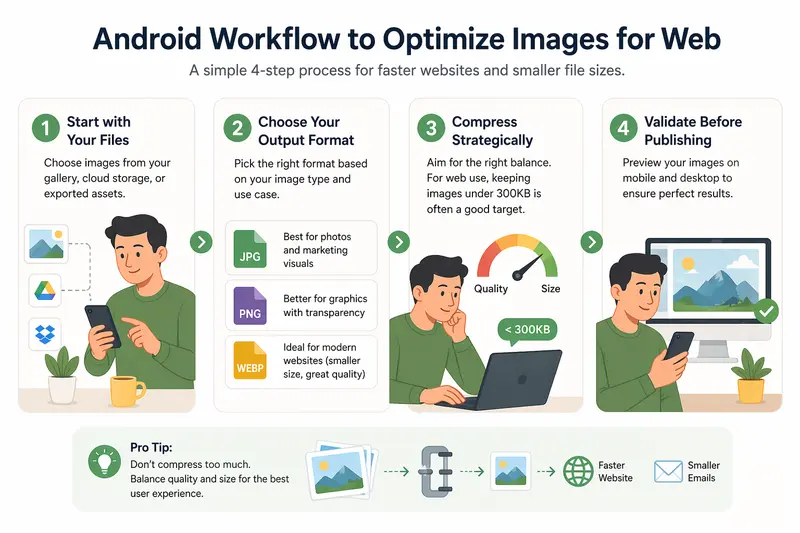
A practical Android workflow for image optimization
Here’s a method that works reliably whether you're handling a few images or dozens:
1. Start with your original files
Pull images from your gallery, cloud storage, or exported assets. If you're working with design tools like Canva or Figma exports, keep the highest resolution versions.
2. Decide your output format early
- JPG → best for photos and marketing visuals
- PNG → better for graphics with transparency
- WEBP → ideal for modern websites (smaller size, solid quality)
3. Compress strategically, not aggressively
Instead of pushing compression to the limit, aim for a balance. For web use, file sizes under 300KB are often a good benchmark for hero images.
4. Validate before publishing
Always preview the compressed file on mobile and desktop. Subtle artifacts may appear differently depending on screen size.
Where Filemazing fits into this workflow
Using a browser-based tool like Filemazing’s image compressor shifts this entire process into one place. The biggest advantage here is ease of use—you don’t need to install anything or switch between apps.
It runs directly in your browser, which means:
- You can upload from Google Drive or your device
- Process multiple files in one go
- Download optimized images without dealing with app storage clutter
There’s also a subtle but important benefit: multi-format support. You can convert and compress in the same flow, which is helpful when you need to compress PNG for website speed or switch formats entirely.
If you're preparing assets for sharing, it’s also worth running them through a metadata scrubbing tool to remove hidden data like location tags—something many marketers overlook.
Real-world test: compressing campaign assets on mobile
I tested this workflow with a batch of 18 images from a recent ad campaign:
- Original format: PNG and JPG
- Total size: ~42MB
- Use case: landing page + email attachments
After compression:
- Final total: 9.6MB
- Average image size: ~500KB → ~120KB
- No visible quality loss on mobile or laptop screens
One insight stood out:
PNG files shrank dramatically when converted to JPG before compression, especially for images without transparency. That alone reduced file size by nearly 60%.
Format comparison: JPG vs PNG vs WEBP
Choosing the wrong format can undo all your optimization efforts. Here’s how they differ in practice:
- JPG
- Smaller file sizes
- Best for photos and gradients
- Lossy compression (some detail loss)
- PNG
- Larger files
- Supports transparency
- Ideal for logos and UI elements
- WEBP
- Modern format with strong compression
- Often 25–35% smaller than JPG
- Not always supported in older systems
Tradeoff to consider:
If your image doesn’t require transparency, sticking with PNG is usually inefficient. Converting to JPG or WEBP first gives much better results when you compress photos for email or web.
Where this workflow shines for marketers
This approach is especially useful if you’re working on campaigns directly from mobile:
- Preparing landing page visuals while traveling
- Reducing image size before uploading to CMS platforms
- Compressing visuals for email newsletters
- Optimizing ad creatives for faster load times
- Converting PDFs into images using a tool like PDF to image conversion for social sharing
- Sharing compressed assets securely after applying file protection via file encryption
Why this matters beyond file size
Optimizing images isn’t just about storage—it directly impacts:
- Page load speed (critical for conversions)
- SEO rankings (Core Web Vitals)
- Email deliverability (attachment limits)
- User experience on mobile networks
File size reductions compound quickly across pages. A few unoptimized images can add seconds to load time.
FAQ
Does compressing images reduce quality noticeably?
It depends on how aggressively you compress. Moderate compression often preserves visual quality while cutting file size significantly.
What’s the best format for website images?
JPG or WEBP for most use cases. PNG should be reserved for transparency or sharp graphics.
Is it safe to upload images to online tools?
Tools like Filemazing treat uploads as temporary processing files and clean them after a short period, rather than storing them long-term.
Can I compress images for email without resizing?
Yes, but combining light resizing with compression usually gives better results.
How many images can I process at once?
Batch processing is supported, though performance depends on file size and network speed.
Final thoughts
If you regularly need to optimize images for web, doing it directly from Android can save time and simplify your workflow. The key is choosing the right format, applying balanced compression, and using a tool that doesn’t complicate the process.
Filemazing offers a streamlined way to handle everything—from compression to format conversion—without locking you into a heavy desktop setup. It’s a practical addition to any marketer’s toolkit, especially when speed and flexibility matter.
Give it a try the next time your images start slowing things down.